Saving Images for the Web
Illustrated Tutorial
Written by: Dmitry Fadeev
Most of us have at some time saved images and pictures to be displayed on the web, and if you have your own website you may be doing this daily—but are these images as optimized as they can be, are we displaying the best image quality for the least file space? In this tutorial I will give my own thoughts on image optimization. This is largely based on experience and is not necessarily science, but I hope this will make things a little easier for those who aren't sure whether they are saving images to be displayed on the web effectively.
The trick is to manage quality of the picture versus the size of the file. The better the image quality, the bigger the file size. The bigger the file size, the longer it will take for your visitors to download the image. Your task is to make sure the file size is small enough to fit into your usability criteria i.e. I want people on slow connections to view my site, or perhaps, most of my visitors have broadband—so I have a little bit more file size to work with. At the same time you want to make sure the image is also of acceptable quality and doesn't degrade past a certain point.
We're not empty handed here, and have three trusted file formats to aid us: the JPG, the GIF and the PNG. When saving pictures in your favorite graphics editor (e.g. Adobe Photoshop) you will be presented with a choice of many file types, and these three are your choices for the web. Without going into the history and the details of how each one compresses the image, let me give you practical examples and explain in simple English what each one means.
The GIF is one of the oldest formats and it compresses the file using a maximum of 256 colors. The GIF will not blur or distort your image in any way at all—it will leave things exactly as they are, crisp and clear...that is...with a maximum of 256 colors. What this means is that if your image uses millions of colors, the GIF may estimate some by dithering pixels of two or more colors, producing a pixelated airbrush feel to it. In a lot of cases, 256 colors will suffice and you won't notice a difference, e.g. web design graphics. On photographs however, you may see the dither in places. Below is an illustration of the dither happening when the image is saved with a 16 color GIF:
As you can see, the GIF actually does an admirable job, that it only has 16 colors to work with. The next image is 256 color GIF, and the results are actually very good:

Because the GIF doesn't compress files, if you save a large image (over 300x300 pixels), then the file size can get much bigger than JPG and maybe PNG. For very small graphics, the filesize will in many cases be smaller, especially if the graphics have many repeated colors. This makes the GIF an ideal format for saving web graphics, things like buttons, tab images, banners and pretty much any other layout image. The advantage here is that the images will in most cases be small in file size and very crisp and clear, since not much visible compression is applied.
The GIF also has one more feature—it allows for transparency. The transparency here is very basic, either it is 100% or it is 0%, which means we cannot have smooth fading out shadows that flow over other images. Instead we can have crisp buttons and graphics. If you try to apply transparency to rounded edges, they may turn out to be very jagged because of the on/off nature of the GIF transparency, so if you need smooth results, either set the background the same on both images or use PNG, which does support smooth alpha transparency.
Indeed, moving on to PNG. It is one of the more modern formats, and can also produce very clear results because its compression isn't very harsh. The PNG is ideal for bigger graphics, such as larger website elements. Its file size will be bigger for tiny images than the GIF, but for small to medium images it is very competitive. It supports smooth alpha transparency, meaning you can have nice fading gradients and shadow effects that will gradually reveal the image below them. To get this you must save the image in 24 bit format and not 8 bit. 24 bit format PNGs take up much more space than the optimized 8 bit PNGs do, so use this wisely.
The JPG is the other format you have available. This is one of the most widely used formats for things like photos, because it has a very flexible compression range. In programs like Adobe Photoshop you can actually tweak the quality of the image after going to the “Save for Web and Devices” menu (under the File menu). You can see the bar that tweaks the JPG quality here:
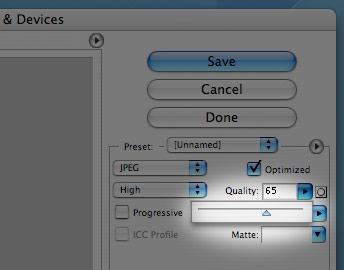
Pulling the bar left will decrease the quality, substantially in some cases, but it will also have a big effect on reducing the file size. Tweak this until you achieve a good balance. I find that if you wish to preserve quality, the ideal range is between 60 and 70 for most images. (The image above was saved with a 65% quality). JPGs are thus great for saving large photos, where the file would otherwise be massive if saved as a GIF or a PNG. JPGs are not great at saving web layout images because they tend to blur areas of the image as they compress them. Use them for screenshots, photos or really large promotional images on your site, but leave the structural images to GIF and PNG.
To conclude, I will illustrate this with two types of image below, and will show you the quality and the file size of each as I save them in each of the three formats. First is a simple layout graphic of a button:
GIF - 1.95 KB

JPG (65% Quality) - 2.42 KB

PNG 8 bit - 1.61 KB

Note that the PNG wins this contest in terms of quality and file size balance, with the GIF close behind. Most of the time however, the GIF may actually come out ahead. This will happen for graphics that are 1 pixel thin—for example gradients or patterns that are then repeated as a background image. So 1 pixel thin and 50 pixels tall image may be repeated on the x-axis forever to produce a header background. If your graphics are that tiny, then the GIF may be better. If your layout graphics are slightly bigger, like buttons, then the 8 bit PNG is more suitable. Both of these formats will ensure crisp clear images with no blurring, and optimal file size for design purposes.
Now let's see how they fare for a more complex picture:
GIF - 39.97 KB

JPG (65% Quality) - 4.73 KB

PNG 8 bit - 35.88 KB

Here the JPG is a clear winner. For photos and large promotional graphics, the GIF and the PNG aren't very suitable. In some cases the PNG can work, especially if you need alpha transparency, but for most cases, the JPG is your tool of choice. It will blur the image a little bit, but it will also reduce file size considerably, so it is a worthwhile sacrifice.
And that's it folks, this is the basics of saving images for the Web. There are of course more advanced techniques, such as telling the GIF what colors to preserve when you save the file, PNG diffusions and dithers, ICC color profiles and the like—but these are unfortunately out of scope for this tutorial, and I will possibly cover them at a later date. However, the simple principles above will have the most impact for the little effort they require to implement—just a little good sense of which format to use and when. I hope this guide helps you make better decisions as to what file format to use and what quality to save it at when you're working with images for the Web.